Question: If you were searching on Google, and saw these three results, which result would you be most likely to click?
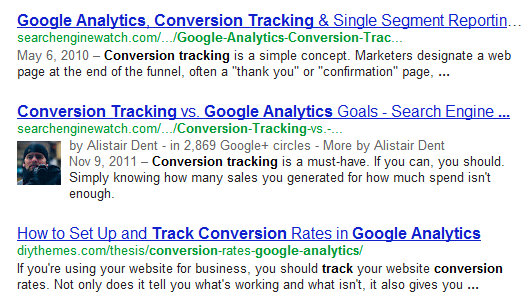
It’s highly likely that you chose the middle one. That extra picture draws the eye and unconsciously adds credibility. Hence, it gets the click.
So how do you get your picture added to your posts? The secret’s the rel=author tag, a gift given us by Google that studies show only a small portion of us are actually using (9% of tech blogs in this case).
But the results of using it include all kinds of good things like more traffic, more optins, more time on site, and yes, more sales.
So why isn’t everyone using it yet? One reason is that implementing it seems to be incredibly difficult, with all kinds of pages giving all kinds of differing systems that frankly, are hard to do.
But, I’ve found an easy way that works as long as you’re the only author on your blog/site (if you’re running a multi-author blog, you’ll need to use a different system like this one.)
Here’s a video that shows the steps for this simplified system. Plus I’ve broken them out into text below so that you can implement each step. If you’ve got the basics already in place, this shouldn’t take you more than 10 minutes to implement.
httpvh://www.youtube.com/watch?v=bzg00Xwyo-g
Figure out your Google+ URL.
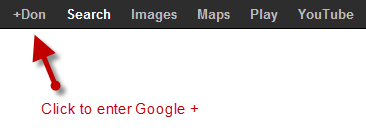
Go to Google.com and log into your Google account (gmail, Google calendar, Google Docs will do the same thing). In the bar that then appears across the top of your browser you’ll see, in the upper left corner +[Your Name]. Click that.
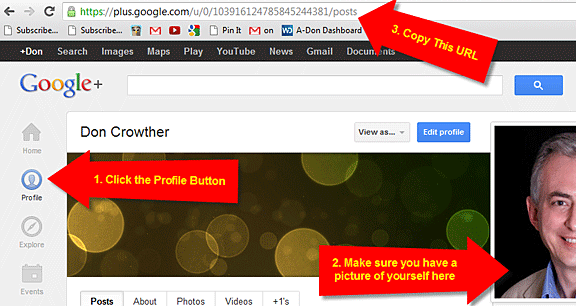
Now you’re in Google+. To get your URL, click on the Profiles link on the left side, check to make sure you have a picture added to your profile and that your posts are public, then go up to the top of your browser and copy the URL from there.
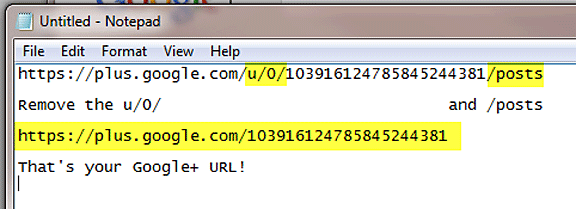
Paste that URL into your text processing program, then remove the u/0/ from the middle of the URL and the /posts from the end. The result is your Google+ URL. (Note that it starts with https, not http.) Save that URL, you’ll need it in a bit.
Now, let’s turn to your blog. Hopefully you have a section on your blog that links to your various social media profiles. If you don’t have one, you definitely should add one today!

(This next section requires some elementary knowledge of html programming. If that’s not your forte, I totally understand, call your webmaster and have them do this part, in most cases it should take them about 3 minutes.)
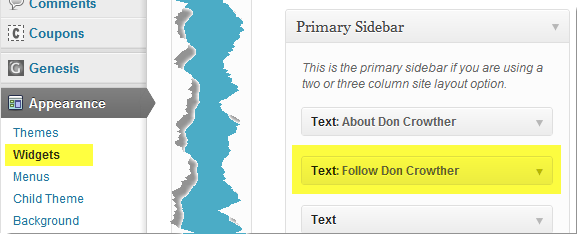
Open your WordPress blog and navigate to the place where the code for your Follow Me on Social Media section is stored. In the theme that I use most, Genesis from StudioPress, (Affiliate Link,) (and many others) this is easily done through using a widget, so that code is located in the widgets section.
In my Genesis theme, it appears under Widgets, then moving across the page, I click Primary Sidebar, then Text: Follow Don Crowther, where I click the down arrow to open up the code.
This is the code that produced the image above. At the end of it, in the red box, is the Google+ code. I’ve inserted the Google+ URL that we got earlier, (no space,) then ?rel=author followed by the close quotation.
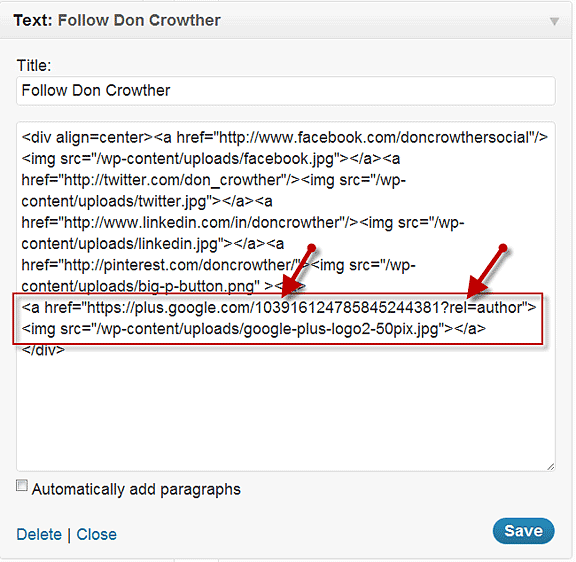
The actual syntax for that is
<a href=“[Google+URL]?rel=author”>What you’re linking to</a>
which in this case translates to
<a href=”https://plus.google.com/103916124785845244381?rel=author”><img src=”/wp-content/uploads/google-plus-logo2-50pix.jpg”></a>
Save that and you’re done with the changes to your blog.
Now that we’ve built the link from our blog to Google+, we’ve got to reverse the process, linking Google+ to your blog.
To do this, simply go back to your Google+ account, and click the blue Edit profile button

Scroll down to where it shows the Other profiles and Contributor links, and click on Contributor
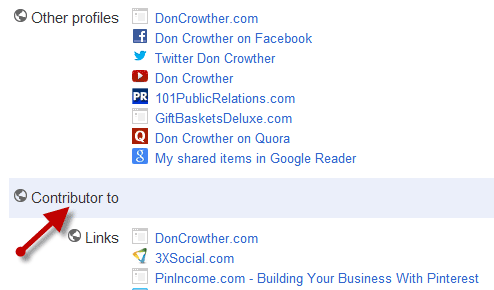
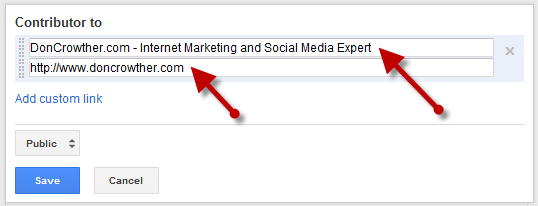
In the resulting box, click Add custom link
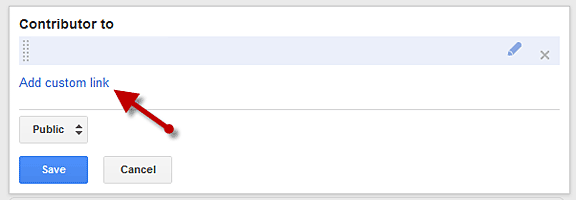
This then opens up the ability to input text about your site (I like to put in more than just my site name here) and a place to enter your URL. Do so. Then click Save.
But before we’re totally done, let’s check that everything worked correctly.
Go to http://google.com/webmasters/tools/richsnippets
This brings up the Rich Snippets Testing Tool. Enter your site’s URL in the box and click Preview
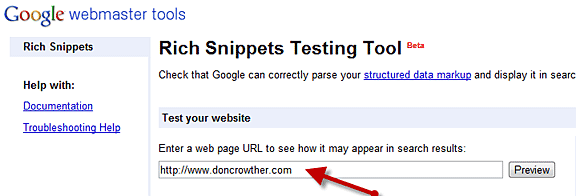
Google then shows you what it sees when it includes your page in the search pages. If your picture is there, you’ve done everything correctly.

Scroll down for a bit more information, and look for the author section and the green line that says Verified: Authorship markup is verified for this page. If that’s there, you’re golden!
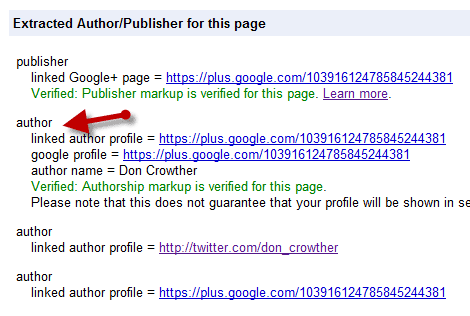
That’s it. You’ve done everything you need to do. Now all you have to do is to wait for Google to reindex.
One word of caution – simply adding this tag doesn’t guarantee that your pictures will show up on your search listings. But, to get them to show up, you pretty much have to have the rel=author relationship created. And the results are absolutely worth it!
Finally, this is not the only way to connect yourself as an author to your page. If you have an email address on the same URL as your site, you can do it another way, which is detailed here.
Let me know your thoughts and results by entering a comment below. And, don’t forget to like, tweet and pin this post so that other people will know about it too!


I’ll be implementing it on my website, but not a wordpress.
My question is, I only need to place the link on my homepage or every webpage I want the rel=author to be functional?
I suggest putting it on every page. Can’t hurt.
Don
Thank you so much for simplifying this – I thought it was the case for a single author blog but so many processes out there are utterly convoluted!
One question, I notice in your test shot you have verified as publisher as well. Once I link my personal G+ profile via rel author with the above process, where do I put the rel publisher link to verify my G+ page? Thanks in advance!
That deserves another blog post, I think! :<) In short, in the meta tags. Don
Great info Don,
Unfortunately I couldn’t managed to implement it. My site is a Joomla! site and I used nice_social_bookmark module. Is this procedure works for Joomla! too? Actually each day I find a reason for to switch to WordPress.
Thank you.
The base principle should work in Joomla too. Since I’m not a user, I don’t know the details though.
Don
I fixed that missing link which should help you solve your problem.
Thanks for the heads up Joan!
Don
My recommendation:
1. Put the code in place that I recommended.
2. Ask your guest author if they are willing to link to your blog as a contributor. If they are, then have a by-line that says By [Their Name] with their name linked to their Google+ profile with the rel=author tag attached. They would have to then link back to your blog as a contributor.
If they aren’t willing or able to figure it out, then don’t worry about it.
Don
GREAT info Don!
Not only did I implement it – but I shared it as well.
Thanks!
Thanks Wes – saw that!
Don
Good info. Thanks.
Just implemented it. Let’s wait to see the results after google will index it.
I looked hours around to find a WordPress Theme which has a similar style
like this one: http://themeid.com/responsive-theme/
but the problem is to find one which supports all the mature marketing plugins, for example a simple “like locker”
Most of us have no time to get every single plugin working on different themes, we need a simple plug and play theme!
So it would be great if you could recommend me/us a theme which has following features:
-Similar style like above
-looks good on any mobile devices
supports important marketing plugins Especially the FAN Buzz Plugin from Nick LaPolla (which is an awesome Plugin)
-works with shareaholic
I also checked out your “Genesis” Theme, maybe we should use that?
Thank you for your recommendations
I believe that Genesis could do what you’re trying to do. I’d suggest that you research that as a starting point.
Don
great tip!
what would be the process if using blogger instead of wordpress?
I’d strongly, strongly suggest that you move to WordPress. Blogger is NOT a good idea because it builds links for blogger, not for you.
So, if I were you I’d put my efforts into moving platforms rather than trying to figure out how to make it work on blogger.
Don
Thank you, Don, for really great information.
Now let me to make two suggestions:
1. profile URL: Ggle+ will give you 2 choices of Profile URL,
where you can choose the one with your username and save these settings.
Isn’t that great?
2. Gplus.to is a service that shortens your Ggle Plus Profile
into an easy to remember link – isn’t it another great tool to use — indispensably!?
😉
Hi don – fantastic stuff as always.
I have a question though – I keep social media ‘Me’ separate from social media my business. So when I update, blog, comment in relation to the business I am doing so as the business. So naturally my google+ link on the website, goes through to the google+ page for the business, ditto twitter, facebook etc.
Naturally on following your video I set up the link accordingly and one of my logos now appears as the image.
My questions is – is there any difference in having an image of a company logo verses having an image of a person? In other words is just having ‘an image’ there helping?
Cheers
Jon
Probably not. Nice work!
Don
Great Information, I’ve implemented now! Thanks for the stuff 😉
Hmm, well I don’t know what’s going on. I went through this exactly as it’s shown about five times, and the Google snippet tool keeps telling me that it can’t find the link in my “Contributes to” part of my Google Profile..though it is there. I checked, re-checked, and even updated it a few times.. still nothing.
Thanx very much for the useful information though..
Cheers
Hi Don – what if you want a topic related picture that represents the topic instead of you picture. Can this be done?
It’s grabbing your picture from Google+. So whatever picture you have in place there is what will appear.
Don
Hi Don,
Aren’t you over-comlicating things? Google lets you add a tag in the section in this format:
See http://yoast.com/push-rel-author-head/
Thanks for this, Don. I could not get this to work before, and now it works perfectly.
Also, I found a plugin that works on WordPress sites with multiple authors: WordPress SEO by Yoast.
http://yoast.com/wordpress/seo/ It adds a field for the Google+ link to each user’s profile.
Thanks again for more great info!
Hi Don,
I have heard about this before and thought I should do it but never knew how. Thanks for the step-by-step instructions.
No I have no excuse.
Excellent information – I’m going to work on implementing now – Thanks Don – always good stuff!